Overview
In this article, we would interface an ultrasonic sensor (HC-SR04) with raspberry pie 4 to measure the distance of an object or obstacle. HC-SR04 is the sensor device that is specially used to measure the distance of an object within the range of 2mm to 400 cm. The ultrasonic sensor works on the principle of measuring the propagation time of the sound waves in between sending and receiving signals. HC-SR04 sends 40KHz signals (8 bursts) for the detection of an object then the time is calculated for the 40KHz signal hitting the object and coming back. That time would be our measured distance. Now, this HC-SR04 sensor has to be interface with a microcontroller or microprocessor to control it in the desired way. In this project, we are gonna use the Raspberry Pi 4 board.
List of All the Components:
Below are the components listed, that are used to make this project.
- HC-SR04
- Raspberry Pi 4
- 680 Ω Resistor (1/4 Watt) resistor
- 1.5 KΩ Resistor (1/4 Watt) resistor
- Connecting wires
- Laptop or Computer (For the programming of Raspberry Pi)
HC-SR04
HC-SR04 is an ultrasonic sensor, its working principle has been explained above. The picture of the sensor is shown below. From the picture, it can observe that the sensor has 4 pins (Vcc, Trig, Echo, and GND). VCC is for the supply voltage and GND for the ground.
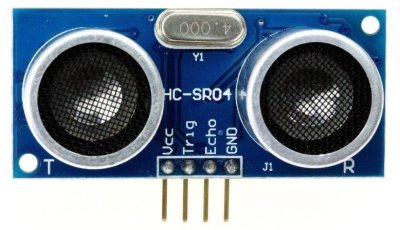
Now to send the 40KHz signal into the Air, the Trig PIN must be set high through the Raspberry Pi for at least 10us. As the ultrasonic signals go in the air, the ECHO pin also gets high and it remains high until the 40KHz hit the object and reaches back to the sensor. So the distance is calculated for the time ECHO was HIGH.
Raspberry Pi 4
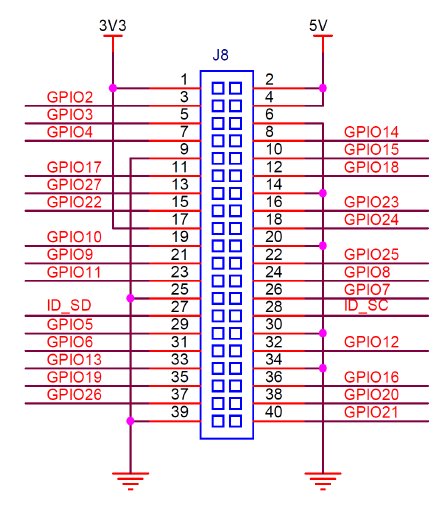
Raspberry Pi 4 is a microprocessor board that runs on Linux. It is a mini-computer, that is used to control electrical components like an ultrasonic sensor. It has some sets of inputs and outputs (GPIO) that allow connecting the electrical components in the desired way. The Pin configuration for the Raspberry pi 4 is shown below.
Design and working of the Circuit
When all the required components are ready, it is time to connect them. The noticeable thing here is that Raspberry works on the 3.3V of logic level, while the HC-SR04 works on 5 V. so their voltage compatibility is required. The Schematic of the Circuit is shown below.
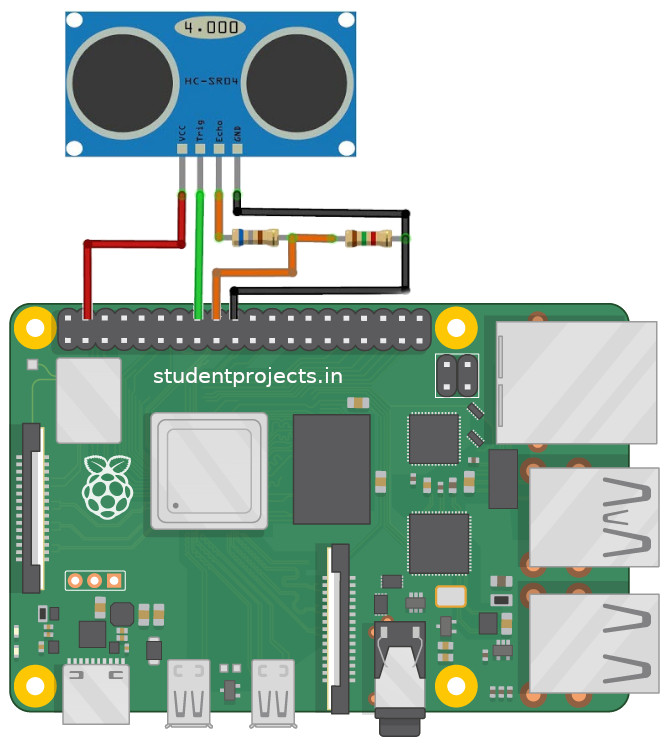
The connections are, VCC of HC-SR04 is connected to the PIN 2 of the Raspberry Pi, the Trig pin is connected to the PIN 16 which is GPIO 23 on the Raspberry board, the Echo is to PIN 18 (GPIO 24), and GND to the Pin 20 on the Raspberry board.
Now the problem is we can’t directly put the Echo Pin of the sensor to the GPIO pin of the Raspberry board. Because the Echo Pin has a voltage of 5V while raspberry needs the 3.3V. so for their configuration, use a combination of 680Ω and 1.5 KΩ resistors are connected between their connection.
Working
The working of the project will be that the ultrasonic sensor would be triggered by the Trig Pin through the raspberry programming, then during the propagation and reflection of 40KHz wave, the Echo pin will provide a high signal to the one of GPIO pin of Raspberry pi as input. This input will be calculated by a program to calculate the distance of the object. The code for this project is given below:
import RPi.GPIO as GPIO
import time
try:
    GPIO.setmode(GPIO.BOARD)
    pinTrigger = 16
    pinEcho = 18

    GPIO.setup(pinTrigger, GPIO.OUT)
    GPIO.setup(pinEcho, GPIO.IN)

    GPIO.output(pinTrigger, GPIO.LOW)
    GPIO.output(pinTrigger, GPIO.HIGH)

    time.sleep(0.00001)
    GPIO.output(pinTrigger, GPIO.LOW)

    while GPIO.input(pinEcho)==0:
        pulseStartTime = time.time()
    while GPIO.input(pinEcho)==1:
        pulseEndTime = time.time()

    pulseDuration = pulseEndTime - pulseStartTime
    distance = round(pulseDuration * 17150, 2)

    print("Distance: %.2f cm" % (distance))
finally:
    GPIO.cleanup()