4 PCI Bus Timing Diagrams
4.1 Basic Read/Write Transactions
Figure 2 shows the timing of a typical read transaction — one that transfers data from the Target to the Initiator.
Let’s follow it cycle-by-cycle.
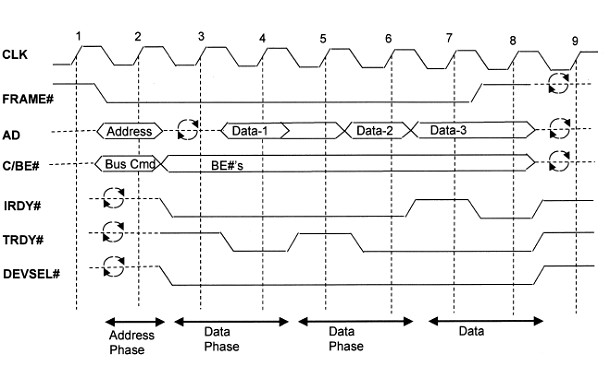
Clock1: The bus is idle and most signals are tri-stated. The master for the upcoming transaction has received its GNT# and detected that the bus is idle so it drives FRAME# high initially.
Clock 2: Address Phase: The master drives FRAME# low and places a target address on the AD bus and a bus command on the C/BE# bus. All targets latch the address and command on the rising edge of clock 2.
Clock 3: The master asserts the appropriate lines of the C/BE# (byte enable) bus and also asserts IRDY# to indicate that it is ready to accept read data from the target. The target that recognizes its address on the AD bus asserts DEVSEL# to acknowledge its selection. This is also a turnaround cycle: In a read transaction, the master drives the AD lines during the address phase and the target drives it during the data phases. Whenever more than one device can drive a PCI bus line, the specification requires a one-clock-cycle turnaround, during which neither device is driving the line, to avoid possible contention that could result in noise spikes and unnecessary power consumption. Turnaround cycles are identified in the timing diagrams by the two circular arrows chasing each other.
Clock 4: The target places data on the AD bus and asserts TRDY#. The master latches the data on the rising edge of clock 4. Data transfer takes place on any clock cycle during which both IRDY# And TRDY# are asserted.
Clock 5: The target deasserts TRDY# indicating that the next data element is not ready to transfer. Nevertheless, the target is required to continue driving the AD bus to prevent it from floating. This is a wait cycle.
Clock 6: The target has placed the next data item on the AD bus and asserted TRDY#. Both IRDY# and TRDY# are asserted so the master latches the data bus.
Clock 7: The master has deasserted IRDY# indicating that it is not ready for the next data element. This is another wait cycle.
Clock 8: The master has reasserted IRDY# and deasserted FRAME# to indicate that this is the last data transfer. In response the target deasserts AD, TRDY# and DEVSEL#. The master deasserts C/BE# and IRDY#. This is a master-initiated termination. The target may also terminate a transaction as we’ll see later.
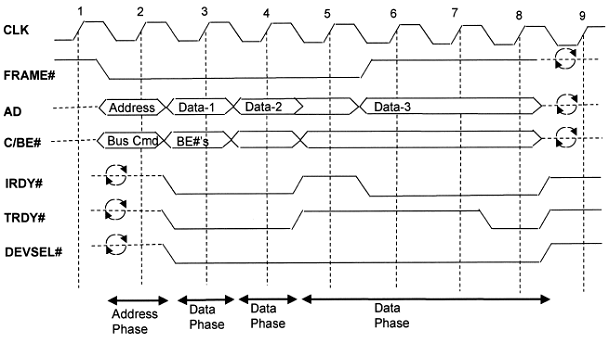
Figure 4-3 shows the details of a typical write transaction where data moves from the master to the target. The primary difference between the write transaction and the read transaction detailed in Figure 2 is that write does not require a turnaround cycle between the address and first data phase because the same agent is driving the AD bus for both phases. Thus the master can drive data onto the AD bus during clock 3.
4.2 Transactions Terminations
4.2.1 Master initiated terminations
A transaction is “normally” terminated by the master when it has read or written as much data as it needs to. The master terminates a normal transaction by deasserting FRAME# during the last data phase. There are two circumstances under which a master may be forced to terminate a transaction prematurely
Master Preempted
If another agent requests use of the bus and the current master’s latency timer expires, it must terminate the current transaction and complete it later.
Master Abort
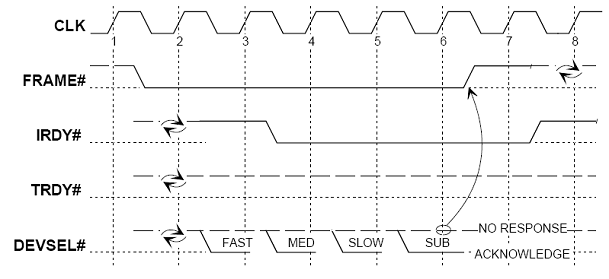
If a master initiates a transaction and does not sense DEVSEL# asserted within four clocks, this means that no target claimed the transaction. This type of termination is called a master abort and usually represents a serious error condition.
4.2.2 Target initiated terminations
There are also several reasons why the target may need to terminate a transaction prematurely. For example, its internal buffers may be full and it is momentarily unable to accept more data. It may be unable to meet the maximum latency requirements of 16 clocks for first word latency or 8 clocks for subsequent word latency. Or it may simply be busy doing something else. The target uses the STOP# signal together with other bus control signals to indicate its need to terminate a transaction. There are three types of target-initiated terminations:
Retry: Termination occurs before any data is transferred. The target is either busy or unable to meet the initial latency requirements and is simply asking the master to try this transaction again later. The target signals retry by asserting STOP# and not asserting TRDY# on the initial data phase.
Disconnect:Once one or more data phases are completed, the target may terminate the transaction because it is unable to meet the subsequent latency requirement of eight clocks. This may occur because a burst crosses a resource boundary or a resource conflict occurs. The target signals disconnect by asserting STOP# with TRDY# either asserted or not.
Target-Abort: This indicates that the target has detected a fatal error condition and will never by able to complete the requested transaction. Data may have been transferred before the Target-Abort is signaled. The target signals Target-Abort by asserting STOP# at the same time as deasserting DEVSEL#.
Retry — The Delayed Transaction
Figure 5 shows the case of a target retry. The target claims the transaction by asserting DEVSEL# but, at the same time, signals that it is not prepared to participate in the transaction at this time by asserting STOP# instead of TRDY#. The master deasserts FRAME# to terminate the transaction with no data transferred. In the case of a retry the master is obligated to retry the exact same transaction at some time in the future.
A common use for the target retry is the delayed transaction. A target that knows it can’t meet the initial latency requirement can “memorize” the transaction by latching the address, command and byte enables and, if a write the write data. The latched transaction is called a Delayed Request. The target immediately issues a retry to the master and begins executing the transaction internally. This allows the bus to be used by other masters while the target is busy.
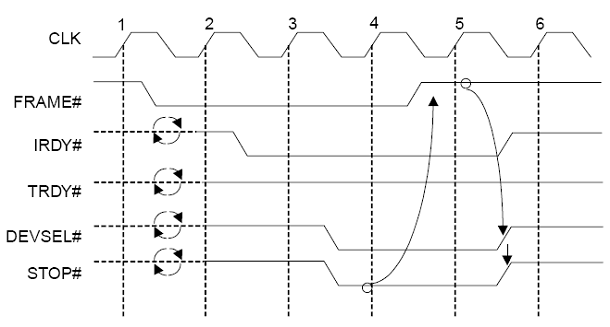
Later when the master retries the exact same transaction and the target has completed the transaction, the target replies appropriately. The result of completing a Delayed Request produces a Delayed Completion consisting of completion status and data if the request was a read. Bus bridges, particularly bridges to slower expansion buses like ISA, make extensive use of the delayed transaction.
Note that in order for the target to recognize a transaction as the retry of a previous transaction, the master must duplicate the transaction exactly. Specifically, the address, command and byte enable and, if a write the write data, must be the same as when the transaction was originally issued. Otherwise it looks like a new transaction to the target.
Typical targets can handle only one delayed transaction at a time. While a target is busy executing a delayed transaction it must retry all other transaction requests without memorizing them until the current transaction completes.
Note that there is a possibility that another master may execute exactly the same transaction after the target has internally completed a delayed transaction but before the original initiator retries. The target can’t distinguish between two masters issuing the same transaction so it replies to the second master with the Delayed Completion information. When the first master retries, it looks like a new transaction to the target and the process starts over.
Disconnect
The target may terminate a transaction with a Disconnect if it is unable to meet the maximum latency requirements. There are two possibilities — either the target is prepared to execute one last data phase or it is not.
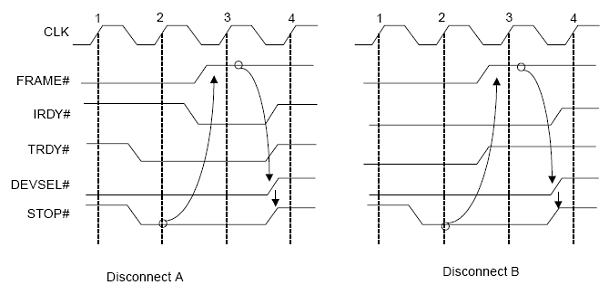
If TRDY# is asserted when STOP# is asserted, the target indicates that it is prepared to execute one last data phase. This is called a “Disconnect with data”. There are two cases as shown in Figure 6: Disconnect-A and Disconnect-B. The only difference between the two is the state of IRDY# when STOP# is asserted. In the case of Disconnect-A, IRDY# is not asserted when STOP# is asserted. The master is thus notified that the next transfer will be the last. It deasserts FRAME# on the same clock that it asserts IRDY#.
In Disconnect-B, the final transfer occurs in the same clock when STOP# is sampled asserted. The master deasserts FRAME# but the rules require that IRDY# remain asserted for one more clock. To prevent another data transfer, the target must deassert TRDY#. In both cases the target must not deassert DEVSEL# or STOP# until it detects FRAME# deasserted. The target may resume the transaction later at the point where it left off.
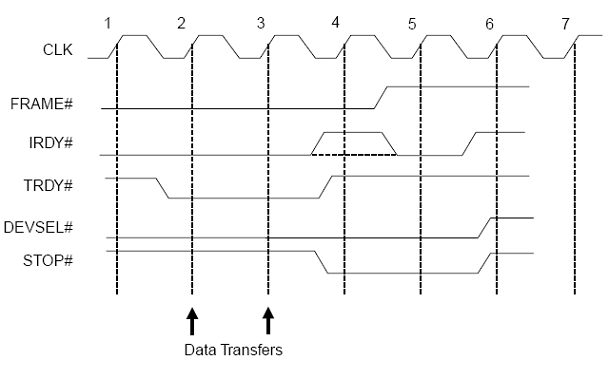
If the target asserts STOP# when TRDY# is not asserted, it is telling the initiator that it is not prepared to execute another data phase. This is called a “Disconnect without data”. The initiator responds by deasserting FRAME#. There are two possibilities: either IRDY# is asserted when STOP# is detected or it is not. In the latter case, the initiator must assert IRDY# in the clock cycle where it Deasserts FRAME#. This is illustrated in Figure 4-7. Note that the Disconnect without data looks exactly like a Retry except that one or more data phases have completed.
Target Abort
As shown in Figure 8, Target Abort is distinguished from the previous cases because DEVSEL# is not asserted at the time that STOP# is asserted. Also, unlike the previous cases where the master is invited (or required) to retry or resume the transaction, Target Abort specifically says do not retry this transaction.
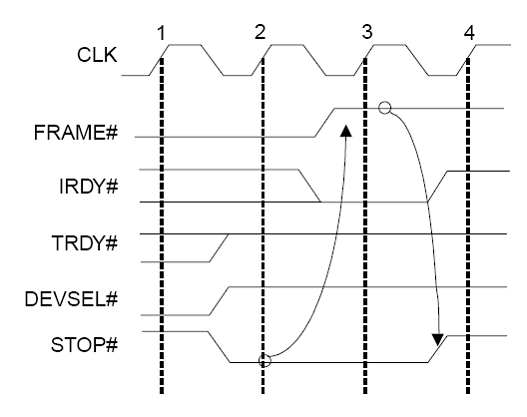
Target Abort typically means that the target has experienced some fatal error condition. The master should probably raise an exception back to its host. One or more data phases may have completed before the target signaled Target Abort.
Chapters:
- Introduction to PCI protocol
- PCI Signal Descriptions
- PCI Bus Transactions
- PCI Bus Timing Diagrams
- Configuration space decoding
- Arbitration process under PCI
- Error Detection and Reporting
Bibliography
- PCI Tutorial by Xilinx
- PCI Bus Demystified by Doug Abbott
Submitted by: Rovin and Sagar

i cannot access anything but the first page
Hi,
Nice post, but you may want to fix Chapter 5: Configuration space decoding.
“CONFIG_ADDRESS 0x3f8
CONFIG_DATA 0x3fc”
0x3F8 and 0x3FC are UART0, not the PCI registers. Note that the diagram shows the correct address.
I understand PCI finally….Thanks….
I would know the différence between the PCI prtocol and VME protocol.
if it is possible! thanks
Historians have found references to early forms of baseball from the 1820’s and 1830’s in New York City state, Philadelphia,
Massachusetts, New Hampshire, Vermont, and other northeastern states.
8 years ago, Jung Da-Yeon was a homely, out-of-shape Korean woman. 19
But Mary kept all these things and pondered them in her heart.