Introduction, Purpose and features
- JNI stands for Java Native Interface
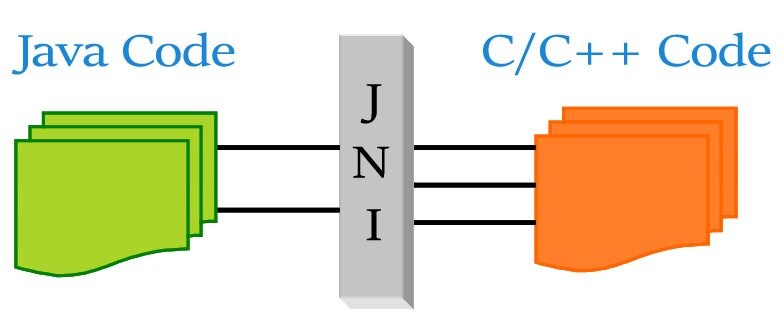
- JNI specifies a communication protocol between Java code and external, native code.
- It enables your Java code to interface with native code written in other languages (such as C, C++)
- Native code typically accesses the CPU and registers directly and is thus faster than interpreted code (like Java)
- Java native methods are methods declared in your Java code (much like you declare an abstract method), but which are actually implemented in another programming language.

JNI allows Java programmers to
- Leverage platform specific features outside a JVM. For example, you typically can’t write a device driver in Java because you can’t directly access the hardware
- Leverage the improved speed possible with natively compiled code (such as C or assembler). For example, you might need an extremely fast math routine for a scientific application or game program.
- Utilize existing code libraries in your Java programs. For example, there might be a really good file compression library written in C. Why try to rewrite it in Java when you can access it using JNI?
JNI Drawbacks
- Your program is no longer platform independent
- Your program is not as robust. If there is a null pointer exception in your native code, the JVM can’t display a helpful message. It might even lock up.
JNI supports
- Native methods can create and manipulate Java objects such as strings and arrays.
- Native methods can manipulate and update Java objects passed into them (as parameters)
- You can catch and throw exceptions from native methods and handle these exceptions in either the native method or your Java application
- This almost seamless sharing of objects makes it very easy to incorporate native methods in your Java code
The Role of JNI
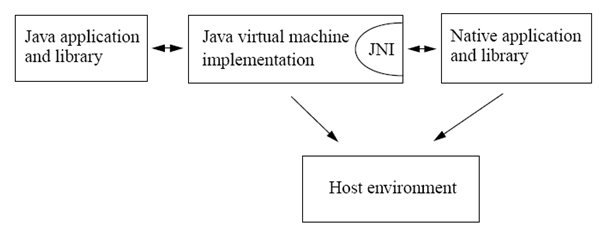
- As a part of the Java virtual machine implementation, the JNI is a two-way interface that allows Java applications to invoke native code and vice versa.
- The JNI is designed to handle situations where you need to combine Java applications with native code.
- As a two-way interface, the JNI can support two types of native code: native libraries and native applications.

JNI “Hello World!” Application
Let’s create the JNI “Hello World” application – a Java application that calls a C function via JNI to print “Hello World!”.
The process consists of the following steps:
- Create a class (HelloWorld.java) that declares the native method.
- Use javac to compile the HelloWorld source file, resulting in the class file HelloWorld.class.
- Use javah -jni to generate a C header file (HelloWorld.h) containing the function prototype for the native method implementation. The javah tool is provided with JDK or Java 2 SDK releases.
- Write the C implementation (CLibHelloWorld.c) of the native method.
- Compile the C implementation into a native library, creating HelloWorld.dll.
- Run the HelloWorld program using the java runtime interpreter. Both the class file (HelloWorld.class) and the native library (HelloWorld.dll) are loaded at runtime.
 The program defines a class named HelloWorld that contains a native method print().
1. Create a class (HelloWorld.java)
class HelloWorld { public native void print(); //native method static //static initializer code { System.loadLibrary("CLibHelloWorld"); } public static void main(String[] args) { HelloWorld hw = new HelloWorld(); hw.print(); } } |
There are two remarkable things here.
1. First one is the declaration of a native method using the keyword native.
public native void print(); |
This tells the compiler that print() will be accessed from an external library, and that it should not look for it in the Java source code. Accordingly, notice that there is no implementation of this method present in the Java code.
2. The second remarkable section of code is the following:
static { System.loadLibrary(“CLibHelloWorld"); //**** Loads CLibHelloWorld.dll } |
• Before the native method print() can be called, the native library that implements print must be loaded. The code above loads the native library in the static initializer of the HelloWorld class.
• The Java VM automatically runs the static initializer before invoking any methods in the CLibHelloWorld class.
Next we compile the JNI HelloWorld java application as follows:
Having the application compiled we can use the javah tool to generate the header (h) file that declares the native method print().
javah –jni HelloWorld |
- – The name of the header file is the class name with a “.h” appended to the end of it.
- – The command shown above generates a file named HelloWorld.h.
/* DO NOT EDIT THIS FILE - it is machine generated */ #include /* Header for class HelloWorld */ #ifndef _Included_HelloWorld #define _Included_HelloWorld #ifdef __cplusplus extern "C" { #endif /* * Class: HelloWorld * Method: print * Signature: ()V */ JNIEXPORT void JNICALL Java_HelloWorld_print (JNIEnv *, jobject); #ifdef __cplusplus } #endif #endif |
In the below line
JNIEXPORT void JNICALL Java_HelloWorld_print (JNIEnv *, jobject); |
• The method name is prefixed with Java_ and then the full name of the class to which it belongs, then the function name.
• This is to distinguish it from methods that belong to other classes and might have the same name.
• The first argument for every native method implementation is a JNIEnv interface pointer.
• The second argument is a reference to the HelloWorld object itself.
Writing the implementation:
Write the native C/C++ code which implements the method. Use the same signature that your header file uses. You might name your file something like “CLibHelloWorld.c”.
#include "HelloWorld.h" #include "jni.h" #include "stdio.h" JNIEXPORT void JNICALL Java_HelloWorld_print(JNIEnv *env, jobject obj) { printf("Hello world\n"); return; } |
Here
- We use the printf function to display the string “Hello World!”.
- Both arguments, the JNIEnv pointer and the reference to the object, are ignored.
- The C program includes three header files:
- jni.h – provides information the native code needs to call JNI functions.
- stdio.h – implements the printf() function.
- HelloWorld.h – generated by using javah, it includes the C/C++ prototype for the Java_HelloWorld_print function.
Compile the C/C++ code into a library (a DLL if your code will run under Windows). – Click here to read step by step procedure to create DLL project using Visula Studio.
If you use C++ Builder to compile your library under Windows, make sure you create a DLL project and then add the C/C++ file to it (e.g. CLibHelloWorld.c). You’ll need to add the following to your compiler’s include path:
- \\javadir\\include
- \\javadir\\include\\win32
Be sure to name your project CLibHelloWorld so the DLL it creates will be named c_library.dll.
Run the Java class (main method). Be sure all the files and dll are in one folder.
java HelloWorld |
You should see “Hello world” appear on the screen!
If you see a “java.lang.UnsatisfiedLinkError” error message, then Java couldn’t find your shared library OR mismatch in native functions.

Thanks for writing such a blog With smooth flow and concept .
Thankx a lot u have solve my major problm…
How To Add .Net DLL In Java?
Please Help?
Thank You In Advanced.
Thank you. If you more examples dealing with Window APIs or hard wear like keyboard or mouse through the JNI will be great. Good job and hope learn more by your easy style.
Thanks for nice flow and lucid explanation. You just saved a lot of my time.
thanks a lot,it really helped me understanding jni easily…
Good article for beginner. Why not update further?
Woo, prefect.
thnks for posting….pls update if u know otherthings…..loved ds post very much
Ranjith thank you for the JNI concept. but i need more help, as my project is on JNI can you share more example using mutli threading.
clear and easy to understand, tks 🙂
Excellent explanation !!:) Thanks