The sewer after being laid and jointed, are tested for watertight joints, and also for correct straight alignment. As described below
1.Test for leakage, called water test:

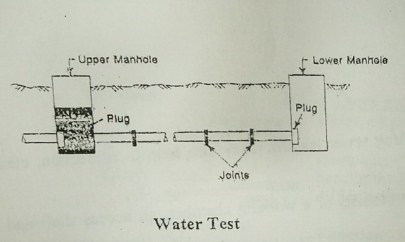
After giving the joints enough time to set in, the sewers are checked to make sure there are “no leakages” through them. The sewer pipe sections are tested for this purpose between manholes using a test pressure of roughly 1.5 metres of water head.
The lower end of the sewer is initially plugged, as illustrated in the fig, in order to conduct this test on a line between two manholes. The upper manhole is now full with water, which is now allowed to flow via the sewage system. Up to the testing head, which is 1.5 metres deep, the water level in the manhole is maintained. By going along the trench, the sewage line is observed, and any sweating or leaking joints are fixed. Additionally, any leaky pipes will be replaced.
2. Testing for straightness of alignment and obstruction

By positioning a mirror at one end of the sewer line and a lamp at the other, it is possible to determine whether the sewer pipe is straight. You can see the entire circle of the light if the pipeline is straight.
The mirror will also reveal any obstructions in the pipe barrel if the pipeline is not straight, which would be obvious. By inserting at the sewer’s upper end, any observations that are present in the pipe can also be tested.
A round ball that is 13 mm smaller in diameter than the interior diameter of the sewer pipe The ball should roll down the sewer pipe’s invert and emerge at the lower end if there are no obstructions, such as yarn or a motor sticking out of the junction.
